No, this is not a blog about Ralph Kramden’s most famous line in “The Honeymooners” TV Show. It’s about Moon Clips. So, what are Moon Clips? They are an adapter which allows rimless ammo to be used revolvers, which generally use rimmed ammo.
The .380 ACP (l) is rimless, while the .38 SPL is rimmed.
However, a few gun manufacturers make revolvers which are chambered for rounds that a normally best suited to semi-automatic pistols. Ruger is one such manufacturer. Their highly popular revolver, the LCR, is one such gun chambered for different size calibers. There are two primary versions, the LCR and the LCRx. The LCR is hammerless and the LCRx has an exposed hammer. (Hammerless, in this case means the hammer is not exposed.) Both of these models are chambered for .38 Special +P, .22 LR, .357 Magnum, .327 Federal Magnum, and 9mm Luger. If, at this point you sang the kids’ song “Which of these is not like the other”, you would not be getting strange looks. That’s because of the five choices of calibers, only the 9mm is rimless and therefore designed to work in semi-automatic pistols.
The Ruger LCR with an enclosed hammer. Per the inset, this model is chambered in .22LR.
More often than not, revolvers are chambered for rimmed ammo, so ss the shooter loads each round into the cylinder, the round does not drop all the way through.
So, if you had a huge stockpile of 9mm rounds at your home, and you are just getting into revolvers, you could purchase either model Ruger LCR in 9mm to avoid having to build up a new stockpile of .38 SPL or .357 Magnum rounds.
Rimless rounds, such as .380 ACP, 9mm Luger or .45 ACP are simply snapped into each moon-shaped slot of the moon clip and loaded into the cylinder as a complete unit.
Then you simply snap five (5) 9mm rounds onto a moon clip and insert the entire loaded moon clip into the cylinder. The moon clip is what keeps the rimless 9mm rounds from falling through the front of the cylinder.
Smith & Wesson is another well-known gun maker who makes revolvers chambered for rimless cartridges. Here is a bag of two moon clips for .45 ACP rounds.
Moon clips are very thin and are generally sold in bags of multiple clips per bag.
Are moon clips worth it? It depends on how well you like revolvers and how large your stockpile of 9mm ammo is. I, personally, am not a fan. I love revolvers but prefer to shoot those chambered in the original designs, namely rimmed cartridges. But that is me. If you like them, buy and use them to your heart’s content. But make sure you sing Frank Sinatra’s “Fly Me To The Moon” when snapping each round into the clip.
So, you were recently at the range and had a difficult time seeing your gun’s sights because the ambient light in or around the range was very low. Short of the sun shining brighter or turning up the wattage on the range flood lights, what can you do about this low ambient light condition? You can change the sights on your gun to make the sights easier to see in low light or no light situations. There are two choices of aftermarket gun sights available. Which you choose is a personal preference. These choices are changing your factory gun sights for either Tritium sights or (Fiber) Optic sights. So, what are they and what are their similarities and differences?
Fiber Optic Sights
A typical optic sight. Notice the openness along the colored glass tube. This is how the ambient light is gathered.
Fiber optics, or from here on out, simply “optics”, are made of transparent strings of plastic or glass. One string is super-thin, like human hair. However, the optical fibers in manufacturing gun sights are wider than usual. The feature that makes optical fiber popular is its speed and range. It can transfer light to as far as 200 miles per second, making it a top choice for telecommunications. When it comes to gun sights, the technology channels light pretty impressively. Fiber optics is almost reflective. It illuminates instantly by absorbing all the light hitting it. Because of this, the material is visible in varying lighting conditions. The gun sight itself, has an open top, so the glass strings can absorb ambient light. The sight then channels that absorbed light to the back of the sight and into the shooter’s eye.
Typical Tritium sights. Notice there is no opening in the top, because they generate their own light.
Fiber optics come in a wide range of colors. You can get it made in any tone, but green and red are the most common for gun sights. Now you may wonder which color to go for. Try different colors and see which is bright enough to give you a clear sight picture. But generally, staying true to green or red for maximum efficiency and accuracy is recommended. In fact, green is a better light conductor than red is.
Knowledgeable shooters do not rely on the length of the sight to judge its efficacy. Rather, they use the width of the glass tube. The wider the glass tube, the more ambient light it can absorb. So, when shopping for or trying out different handguns, focus on the width rather than the length of the glass tube. However, there is a downside to judging the gun sight solely on its width. Often, wider optics, while providing good light, obstruct the target you are aiming at.
This is the exact model I installed on my Ruger Mk-IV Target pistol.
So, what are fiber optic sights good for? Fiber optic sights are not like ordinary night sights. They don’t generate illumination on their own. Instead, they glow when the light from the surrounding ambient light hits them. That is why fiber optics work amazingly well in broad daylight. A fiber optics sight is suitable for the daytime when the sun is blazing. The more intense the sunlight, the brighter the light will glow. As a result, it will also give a good and clear sight picture. Fiber optic sights are ideal for sport shooting. The sight’s small diameter rod offers precise shooting, while the rod illuminates in external environments. In fact, at my favorite outdoor range, there is significant tree cover during the spring and summer months. So much so, that if the wind blows the leaves just right, their shadow is cast directly onto my gun, reducing the ambient light hitting my gun. An optic sight was a perfect changeout for me.
The actual glass tube is more fragile than Tritium sights. Care must be taken on handling the gun. If the glass tube should break, many models are designed so the tube is replaceable. There are some optic “kits” available which includes the sight and interchangeable glass tubes. This will allow you to go from green to orange quickly, if you want to see if a different color provides a better sight picture.
This Optic is a kit. It allows you to interchange the glass tubes, either due to breakage or the shooter simply wanting to try a different color.
Tritium Sights
Tritium is a hydrogen isotope (3H) that rarely occurs naturally. Instead, this is radioactive material and is mostly made artificially for illumination purposes. Radioactivity can be quite dangerous. But fortunately, tritium has relatively low energy. That makes it less harmful to humans but quite beneficial for lumination in guns. Tritium sights work just like a glow-in-the-dark toy. You have to expose them to a light source, and they will start generating their own light. Tritium does so through a phenomenon known as beta decay. It releases electrons that react with a phosphor material to produce light. The generated light is bright but not strong enough to affect the shooter’s night vision.
As with anything that is radioactive, its efficacy is measured in terms of “half-life”. When searching for tritium sights, you may have encountered the term “tritium half-life.” Ever wondered what that is? It is time a radioactive isotope takes to become half of its initial value. For instance, tritium’s half-life is estimated to be around 12.5 years. That means a tritium sight will start emanating light half as intense after this time period. But this doesn’t indicate that the light will become useless. Instead, it will just get a little dim. And for this reason alone, tritium sights can never be a permanent solution for firearms. No one can actually estimate the potency these instruments have. So, if you have a tritium sight on your gun and store the gun in your safe for lengths of time, you may notice the light given off by the sight may be duller than the last time you pulled the gun out of your safe.
Like fiber optics, tritium sights also come in multiple colors. If your main focus is on elongating the lifespan of your tritium sight, you must choose the color accordingly. That’s because every color degrades differently. For example, green tritium is an excellent and safe choice for dark environments. In addition, it is very durable, with a lifespan of 12 years. On the other hand, yellow tritium is also a good choice as it’s bright but comparatively dull than green. Yet, its lifespan is also 12 years. If you’re shooting at great distances, yellow tritium can cause strain to your eyes. Tritium also comes in orange. But it’s hardly used in guns as it’s less reflective and doesn’t allow the shooter to focus on the object in front. Orange tritium also has a relatively low lifespan of about 5 years.
So, what are tritium sights good for? Tritium sights work best in darkness. These are exceptional low-light night sights, making them ideal for defensive shooting. Moreover, their prominent footprint sight facilitates the shooter in quickly locating the front view. They are the ideal choice for defense firearms to help the shooter shoot accurately at the target. The best part is that tritium sights can be continuously illuminated, which is why they are also available in glow-in-the-dark clocks and wristwatches. You may also see them in exit or emergency signs and glow sticks.
Aiming becomes much easier in low or no light situations with the addition of an aftermarket tritium or optic sight.
So, Which Is Better?
Like just about everything in the gun owner’s world, as you can deduce, fiber optics and tritium sights are efficient for different situations. While the former works during the day, the latter is ideal for the nighttime. Fiber optics are less expensive, while tritium can be heavy on your pocket. So, which one do you think is better? Well, the answer comes down to your requirements. Ask yourself whether you’re going on a shooting adventure or want an everyday weapon. Then, go through the pros and cons of each sight and make the right choice. If you’re still clueless, here are a few factors to consider in order to find your answer:
Price
Regarding the price, fiber optics are less expensive than tritium sights. A little reminder: the former are transparent strings of plastic, while tritium is a radioactive isotope made artificially for illumination. On average, a fiber optic sight will come at almost half the price of its counterpart. So, if money is your concern, you should go for the fiber optic one.
Reliability
Fiber optics require a considerable amount of light to work, while tritium sights generate their own illumination. But don’t forget that tritium’s luminosity can degrade over time. It will become less effective in a few years, mainly because it continuously glows. If you keep your tritium sight in a drawer for years and take it out, you may find that its magic is gone. In the worst-case scenario, it may not even work entirely. On the other hand, fiber optics sights don’t need previous exposure to work. Also, the material doesn’t degrade over time.
Optic Sight Pros
Optic Sight Cons
Tritium Sight Pros
Tritium Sight Cons
Versability
The comparison between both sights ends at versatility. Fiber optics refracts light from the environment to give you a good view. But if you’re in dark surroundings and want to draw your firearm, you won’t be able to reap its full benefits. That’s when you’d need a tritium sight. When it’s daytime, the scenario is quite different. The tritium light won’t be noticeable under the sun, while fiber optics one would give an intense light.
Installing Aftermarket Sights
This pistol sight pusher tool is available on Amazon.
Installing them is dependent on your gun model. Many gun models have them held in with tiny screws, such as the image of the sight for my Ruger Mk-IV Target pistol. Others, like Glock and Walther, have a screw under the sight which has to be removed. Therefore, the slide, barrel and slide spring have to be removed to provide accessibility to the tiny screw on the underside of the muzzle. Still others, like the two images at the beginning of this blog, are held in place with a dovetail mount. They require a special pistol sight pusher too to push the sight through the dovetailing. The tool can be purchased on Amazon. If you are not comfortable doing it yourself, have a gunsmith do it.
So, you have your Concealed Carry Weapons (CCW) permit. But are you actually ready to carry?
Concealed carry weapons permit requirements vary from state to state, ranging from minimal classroom training to none at all. And fortunately, Pennsylvanians are on the none at all side, in terms of legalities. There is no law on Pennsylvania’s books that requires CCW wannabes to obtain any training, not even minimal training.
Of the more than 22.01 million CCW permit holders in the U.S., less than two percent have training beyond the baseline requirements. This percentage of those being trained keeps decreasing with every state that becomes a Constitutional Carry state (some call it “Permitless Carry”), because the whole point of being constitutionally able to carry is that there are no impediments to exercising your Constitutional rights.
But is that ideal? Yes, here in Pennsylvania, you can very easily obtain your concealed carry permit and begin carrying in public. But should you do so without being trained? The answer is a definitive “NO”. Not because I am instructor. But, because I believe it is the responsibility of every gun owner to be properly trained.
Imagine you are faced with a life or death situation and the only way to survive is to use your firearm in self-defense. A million things will go through your mind at that moment, such as, Is the safety off? Is there a round in the chamber? Am I aiming on target (critical mass)? Are their innocent bystanders around? Does the attacker have buddies nearby? Can I get my cover garment out of the way in time? You are going to attempt to answer these and many more questions in a nanosecond.
Now, in addition to the million things racing through your mind, add in the psychological, physiological and perceptual conditions your body will go through in that moment of extreme stress. The adrenaline dump, the tunnel vision, the uncontrollable shaking, the slowness of time, etc., are just some of the effects you may experience. Are you ready to handle that?
Can you draw from concealment quickly and effortlessly to get the drop on the bad guy before he gets the drop on you? So let’s say you do, and you shoot him first. Have you given any thought to the fact that at that very moment you squeeze the trigger, your life, as you know it has just ceased to exist?
Because, now comes the aftermath. Do you know what to do after you shoot your attacker? Do you know what to say to the police? What not to say? Do you know do with the gun you just used? Do you know if you will be sleeping on a pillow in a holding cell or in your own bed? Do you have a lawyer? If you do, is your have a lawyer an expert in gun or self-defense law in your state, or is your lawyer Cousin Vinny? Do you have the cash to pay attorney fees? If not, there is a high probability you won’t have money for bail either. Or will you put up your house up as collateral for bail?
This is why if you are going to carry, it is imperative that you get properly trained. Yes, first there is the obvious to learning how not to shoot your dumb ass, but more importantly, to obtain the necessary physical and mental muscle memory needed to save your ass from being shot and from being incarcerated.
So, if you want to get your CCW permit, have your CCW permit for a short while, or have it for a long time, click here to register for a Concealed Carry class offered by Dakota Firearms Training Academy.
In our Basic Pistol classes, we teach students about shooting fundamentals…aiming, breathing, etc. One of the topics in this category is Trigger Control…being able to control the squeezing of the trigger during shooting so the shot pattern on the target is grouped and not scattered all over the place.
However, because we are indoors in a classroom setting with limited time, we can only teach with the aid of laser-fired training guns at the highest overview level. To train on trigger control for real and for a more detail understanding, students need live-fire training at a range.
The four main areas of trigger control, snatching, pushing, heeling and jerking.
Shooting at the range is supposed to be enjoyable, not discouraging, so the students get the desire to come back and want to shoot some more. The easiest way to make shooting enjoyable for first time shooters is for them to experience “wins”…hitting the target. I’ve seen some new shooters initially stand 25 feet away from the target and get discouraged when they don’t have a tight shot grouping if they hit the target at all. Twenty-five feet is too far away for new shooters learning how to shoot. Get closer. Start off by standing only five feet from the target. At five feet everyone hits the target, and new shooters begin getting the confidence they are doing things right. Then as they gain more confidence in their gun handling, back up to further distances. If the students’ ultimate goal is to have a gun for self-defense, most attacks happen at 7 yards or less (21 feet or less), so that is the distance they should be practicing. Shooting from distances greater than that are merely honing their marksmanship skills, not necessarily preparing them for the real world of self-defense. So new shooters should not back up to more than fifteen feet.
Distance from target is the easiest fix for students to have an enjoyable and memorable visit to the range. And it requires no skill. Where the real skill comes in, is to be able to “read” the shots of your target. Shot placement on targets tells a story of the shooter’s mechanics when squeezing the trigger.
Snatching is using too much finger on the trigger. In this example, the trigger finger is in the middle of the second joint.
Shot placement is identified using a “clock” analogy…an analog clock, not a digital clock. So, if the shot pattern is straight up from the bullseye, we say the shots are at “twelve o’clock”. Shot patterns to the right are said to be at the “three o’clock” position.
The key to learning and controlling the shot pattern is the core of the entire topic of shooting fundamentals. There are four major incorrect techniques or actions shooters use which cause their shot patterns to hit anywhere but the bullseye. These four actions are called “snatching”, “pushing”, “heeling” and “jerking”.
These actions will be explained from the point of view of a right-handed shooter. For southpaws, simply flip the explanation.
Pushing is using the very tip of the finger to squeeze the trigger. In this example, the trigger finger is touching the trigger all the way at the end of the finger, near the fingernail.
Snatching. This action causes the shot pattern to be to the right of the bullseye, or the three o’clock position. It is generally caused by having too much finger on the trigger. When the trigger is squeezed, too much finger on the trigger causes the gun’s front sight and the muzzle to shift to the right. If the gun’s trigger pull weight is light, as is usually found with striker fired pistols, the shooter should have the front pad of their index finger on the trigger. This is the fingerprint area of the index finger. “Too much finger” means the shooter moved their finger back and had their index finger’s first joint on the trigger rather than the index finger’s pad. The reason the muzzle shifts to the right is because at the joint is where the fingers begin to have muscle control. There are very little useable muscles in the pad of the finger. The muscles in the first joint are what causes the index finger to begin bending. As such, with new shooters anticipating the recoil, these muscles can yank the trigger rather than squeeze the trigger, causing the muzzle to shift to the right.
Pushing. This action is the opposite of snatching. In this case, the shot pattern is off to the left, often the nine o’clock position. This generally occurs when the shooter has too little finger on the trigger, causing the front sight and muzzle to shift to the left. An example here is when the shooter has their index finger on the trigger close to the fingernail, rather than center in the finger pad. This easily happens when the shooter switches guns during your range visit. Shooters start off with a striker-fired gun with a lighter trigger pull, then switch to a double-action hammer fired gun with a heavier trigger pull, but without compensating by moving their finger to use the first joint. In essence, the shooter is still using the pad of their index finger.
Heeling is pushing the grip of the gun with the heel of the hand, forcing the muzzle up.
Heeling. This action causes the shot pattern to be high on the target. This generally occurs because the shooter is anticipating the recoil. Since the recoil will cause the muzzle to rise, the shooter is anticipating that rise and thus driving the heel of their palm forward to compensate for the anticipated muzzle rise. The fix is to have a friend load a magazine with a mix of live and dummy rounds. When a dummy round is fired, the shooter will not get the recoil and be better able to see if they are heeling the gun.
Jerking is anticipating the recoil and jerking the trigger, which pushes the muzzle down.
Jerking. This action is causes shot patterns to be low on the target. Instead of gently squeezing the trigger, the shooter quickly jerks the trigger. Doing this causes the trigger to be pulled down slightly, causing the front sight and muzzle to drop down. The fix it is to place the index finger pad on the trigger and squeeze the trigger consistently throughout the trigger’s travel path, not quickly jerking the trigger backwards.
When my online gun store first went online, I had to test the credit card gateway to make sure it worked. There was no better opportunity to test the gateway than to purchase a gun off my own site. So, I ordered a Ruger Max9, TALO edition. That means it came with a factory installed Crimson Trace red dot.
I never really used a red dot before, so I did not know what to expect. But many of my distributor catalogs had gun models with them on, so I figured I would learn more about red dots.
Typical Handgun Red Dot Cross-Sectional view. The light (bottom left) is displayed onto a tiny mirror which reflects onto the angled optic. The angled optic then shines the red light beam into the shooter’s eye. In this photo, the gun muzzle is to the left and the shooter is to the right.
Here is what I learned, both from reading about them, then actually shooting my new Ruger with it. But first, I had to understand how they work. The part that everyone sees when they look at your gun is a glass element sticking up from the slide, the optic if you will, encased in a metal frame. Directly beneath the optic, there is a battery-operated red light which is projected onto a tiny mirror. The mirror reflects the red light onto the glass element. This glass element is curved, so the projected red dot is refracted or presented to the shooter’s eye. The red dot itself, does not actually show onto the target, like a laser does. Some models come with a brightness setting so the red dot can be changed to be brighter or darker, depending on the ambient light surrounding the shooter. In areas with direct sunlight, such as an outdoor range, the brightness setting will be turned up, so the red dot’s brightness compensates the overpowering sunlight. In areas with low lighting, such as an indoor range, the brightness setting will be turned down, so the red dot’s brightness will not overpower the shooter’s sight picture.
So here is my analysis.
First, the pros.
Pro #1– Target acquisition is much quicker, once the shooter becomes familiar with acquiring targets with the red dot sight.
Once trained, target acquisition is much quicker with a red dot. The optimal dot placement within the optic is just over the front sight post, as shown here.
Pro #2– With stock iron sights, the shooter has three points to line up; the rear sight, the front sight and the target. With red dots, the shooter only has two points to line up; the red dot and the target.
Pro #3 – And the biggest pro has to do with handling the stress of an attack. Under stressful situations, such as being confronted by an attacker, the body undergoes tremendous physiological changes as the it prepares to ward off the attack. One of the changes the body undergoes in a lot of people faced with an attack is tunnel vision. This is a phenomenon in which the shooter’s eyes focus on the threat, such as the muzzle of the attacker’s gun and not elsewhere. With tunnel vision, many shooters have claimed that they did not even see their own front and rear sights. So, by countering the threat with both eyes open, simply looking at the red dot is often a quicker way of putting the gun on target of an attacker.
Now the cons.
Con #1– There is a longer relearning curve. It takes more practice to become proficient with using a red dot. And I heard this from many shooters who have used them way before I started to use one. This is not a showstopper. It simply means you need to practice more with an unloaded firearm in your home. Simply pick an arbitrary target in your home, draw and aim your handgun until the red dot aligns easily over the target.
There are many different types of “dots”, with differing sizes and patterns.
Con #2 – The “Arc Of Movement” is exaggerated. If you took Dakota Firearms Basic Pistol class, you learned that the Arc Of Movement is the natural shaking your body undergoes when trying to hold the gun steady while aiming it. With a red dot, this shaking is more pronounced, which can be overcome through training.
Con #3 – The transitioning between brightly lit and dimly lit environments. You may have to adjust the brightness setting to compensate between the two lighting environments. To me, this is not that big of a con, as when I go to the range, I am either indoors the whole time or outdoors the whole time. And the brightness setting can be adjusted to a middle ground setting.
There are many types and sizes of red dots. The smaller ones on the left are for handguns and are generally the “open” style, while the larger ones on the right are for long guns, and are generally the “closed” style.
Con #4– The red dot can become obstructed particularly with those for handguns. There are two styles of red dots. The first is the “closed” style which is usually mounted on larger firearms, such as AR-15s. The second is the “open” style which is usually mounted on handguns, because of size considerations. The closed style has additional lenses in front and rear it to prevent dust and dirt from laying on the optic lens. The open style does not have those additional front and rear protection lenses. Therefore, the optics window can easily become dirty, dusty, wet, or even fogged because the optics window is exposed to the elements. So, if you decide to use a red dot, cleaning the optic lens must be part of your normal regimen.
Con #5 – More stuff requiring maintenance. Red dots require a tiny battery to work. So you will need to either charge the internal battery or replace it when it loses power.
If your purpose for desiring a red dot is quicker target acquisition to counter an attack, a red dot might not be for you. As most attacks happen within 10 feet, a well-placed shot to the attacker’s “critical mass”, aka the chest, will probably do. Or if you want to know where your shot will be placed in low light conditions at that distance, consider a gun-mounted laser.
A question I get periodically is “can I dry fire my gun?”. The answer is “Yes…but with some caveats”. For the uninitiated, dry firing is practicing every phase of the firing process using an unloaded firearm. Dry firing is an essential part of your overall training regimen, as it allows you do practice all the fundamentals of shooting…grip, aiming, breath control, trigger control, hold control and follow through. Dry firing is perfect for practicing at home. Perfect for practicing drawing from a holster, drawing from different positions or drawing from behind cover.
Dry firing using snap caps can address and alleviate double-feed issues, such as in this photo.
All modern firearms allow dry firing. If you are firing a center-fire gun, you should be alright because the firing pin, will simply extend into the center of an empty chamber.
The chamber of a .22LR gun. A indentation at the 12:00 position is damage caused by dry firing this gun without the use of snap caps.
But this is not the case with rim-fire gun. The reason is that the firing pin is designed to pinch the rim of the rim-fired cartridge, if you dry fire a rim-fire gun, the firing pin can easily hit the outer circumference of the chamber, there by possibly doing damage to the firing pin.
But regardless of the gun type, you should always use snap caps. These are dummy ammunition rounds, often made out of plastic, which have a rubber or spring-loaded primer which absorbs the firing pin hitting it.
There are many aids beyond snap caps which can assist you in dry firing. Beside snap caps, the best aid is a laser cartridge. This is a cartridge, a snap cap of sorts, chambered in your caliber, that you insert in your gun’s chamber. When you squeeze the trigger, instead of the firing pin hitting an inert snap cap, it hits the laser cartridge and shoot a laser beam at your target.
Snap caps with a rubber primer, which saves wear and tear on the firing pin
Another aid which works in conjunction with the laser cartridge is a dry fire system. The system uses a smartphone app and a smartphone stand. You download the app onto your phone and launch it. Then mount your phone onto the stand and point it at your target, with the target completely filling your phone’s screen. When you squeeze the trigger, the laser beam hitting your target is registered by your phone’s app. The app then tells you or shows you your shot placement.
The problem with these systems is that you lose all your follow through practice. The reason is that after every shot, you need to rack your gun, thus negating the follow through concept of keeping your gun on target. But they are better than nothing for dry firing your actual firearm.
Similar in nature to how predator animals go after the old, weak or young prey, human predators will go after those who are defenseless. By “defenseless”, I am not saying these people have no way to defend themselves. I am saying they choose to be defenseless by not being aware of their surroundings. Animals which are typically seen as prey are always on the lookout for danger. They turn their eyes and ears in the direction of danger. For example, my family is constantly seeing rabbits in our back yard. Watch them, and you will notice their two long ears are constantly moving…moving in the direction of sounds which could represent potential threats.
Human example. Suppose you are walking around the mall. Are you paying attention to your surroundings or is your head buried in your phone while you are texting, like today’s generation does exclusively? Do you know where the nearest exits are? Does any mall patron seem out of place to you, like wearing an overcoat in 90 degree weather? Are you fumbling in your pocket or purse for your keys? Is anyone lurking near your car?
Being aware of your surroundings is known as situational awareness. And being aware of your surroundings removes your defenseless position. Criminals know their most successful attacks are those in which the element of surprise is on their side. So, if given a choice, criminals will come after those who are not paying attention…because the element of surprise is on the attacker’s side. If YOU have the element of surprise on your side because you are aware of your surroundings, it will be more difficult for the attacker to do you harm, because you will have devised a plan to deal with the potential threat.
Situational awareness is the concept of always being aware of your surroundings. And it is a learned skill and takes a little practice to master. Situational awareness starts with avoidance. Avoid areas and places which could harbor a threat. Don’t walk in dark alleys at night. Don’t drive into the hood. Don’t engage someone in road rage.
As mentioned, situational awareness is a learned skill. To help with that learning, the late, great Marine Lt. Col. Jeff Cooper came up with a color code. Each of his four (4) colors represents an increased awareness of potential threats.
Jeff Cooper’s Color Codes
Condition White. This means that you are calm and unaware of your surroundings. You are oblivious to the world around you. This is most of today’s generation, walking out of the mall texting their friends or checking social media. People in Condition White are the perfect targets for criminals. In reality, the only time you should be in condition white is when you are asleep.
Condition Yellow. This means you are relaxed and calm, but paying attention to your environment. You hear and see things around you, but your antennae are on. You walk out of the mall, but your head is up, your eyes are open and moving around to scan your environment…who or what is around you. Everyone should be on Condition Yellow. This should be the most common condition. You look good in yellow.
Condition Orange. This means your senses are heightened. Something doesn’t seem right. You walk out of the mall and see a guy leaning against a pole in the parking garage which you have to walk past. In this condition, something currently is not a threat, but could be. This condition is where you formulate a plan…”I will do _________ if the circumstances escalate and becomes a threat”. This plan must be something conjured up quickly. In condition orange, you have the upper hand, because the attacker’s element of surprise is gone.
Condition Red. This means the threat becomes real. The man leaning against the pole suddenly pulls a knife or a gun on you. At this juncture, it is “game on”. You execute the plan you came up with in condition orange, even if that means drawing your gun. In Condition Red, you must be committed to pulling the trigger until the attack is stopped, even if that means the attacker dies…then it sucks being him.
The beauty of Cooper’s color code is that the colors are fluid. If you are in Condition Red, and the attacker suddenly runs away before attacking you, then you move back to Condition Orange. Your senses are still heightened but you no longer have to commit to stopping an attack.
In our concealed carry training classes, before the students arrive for class, the instructor places objects about the training room, examples of which could be a cartoon image of Fred Flintstone taped to the wall, a swatch of color fabric near the bottles of water, or anything else which can be used to determine awareness. Then when we get to the Situational Awareness portion of the class, the instructor asks the students if they have seen Fred Flintstone or what color the fabric swatch is, WITHOUT now scanning the room. The point of this simple exercise is to see who paid attention upon arriving for class.
A very popular accessory many gun owners are installing on their handguns are lights…mini flashlights if you will. Watch any episode of Criminal Minds and when Shemar Moore’s character, Derek Morgan, draws his service gun, you see the light mounted under the muzzle of his service weapon.
Typical gun light mounted on the Picatinny Rail of this Sig P320
But are lights really needed? Well, it depends. If you are in law enforcement or in the military, then probably. Your respective jobs require you to enter dark buildings or dimly light areas, where lighting up the area with a gun light allows you to aim better at bad guys or rag head terrorists.
But what if you are not law enforcement or military, and rather, just a regular concealed carry gun owner? Do you need an accessory light mounted on your EDC? Probably not. And here’s why not.
First, members of law enforcement or the military do not have to conceal their service weapon. So because the service weapon is open carried, It is much easier to find holsters for full size service weapons with accessory lights than it is to find holsters for conceal carry which permit accessory lights. They exist, but are just harder to find.
Second, many of these accessory lights, especially if you want one with a high lumen count, are large. Concealment becomes much more challenging. The battery for the light takes up space and has to be located somewhere.
Third, these accessory lights only mount to the Picatinny Rail under the muzzle of the handgun. This limits your EDC choices to pistols containing Picatinny Rails.
An IWB holster which accommodates a gun light. Notice the opening of the holster at the muzzle end to accommodate the light.
Fourth, the battery has to be dealt with. Either it has to be periodically recharged, or it has to be replaced.
Fifth, in order to be extremely comfortable working with a gun light and obtaining the necessary muscle memory of using it, you need to practice shooting with the light on. How many outdoor ranges are open after dark to allow you to practice? Or how many indoor ranges will dim the overhead target lights so that you can shoot paper targets in near dark conditions? Their whole purpose is to have a well lit area so nothing can go wrong because of poor lighting.
But let’s look at the need for an accessory light from two practical perspectives; home defense and concealed carry.
If you have a home defense firearm, perhaps stored in the nightstand or near the bed, an accessory light can make sense. You hear a disturbance in the middle of the night, grab your home defense handgun, turn on the gun light, and investigate in total darkness, except for the light beam. Your goal is to to sneak up and surprise the intruder by catching him in the act of some nefarious activity. But keep in mind that intruders are always on the lookout for homeowners closing in on them so their senses are heightened. The minute the intruder sees the light beam from your gun light, even if the beam is not yet pointed directly at the intruder, the element of surprise is gone. We see this all the time in movies and TV shows. Someone breaks into an office building to steal documents out of a file cabinet. The intruder sees the light beam down the hall of an approaching security guard or the police, and they take some kind of evasive action so as not to be discovered. But in your home invasion case, depending on the intruder’s intentions, you could be shot or the intruder can use that oncoming light beam to flee. But yes, a gun mounted light will help you aim better. And it helps you identify if the thug is pointing his gun at you. The trick here is to not turn on the light until you are aiming your gun at the intruder. But once the element of surprise is gone, you are not going to remain in total darkness except for your gun’s light beam. You are going to turn on some house lights. So at most, your gun light will be turned on for only about five minutes.
Here, as with most gun lights, the light protrudes forward of the muzzle. This necessitates that a holster have an “open” muzzle end to allow the light to protrude through the front opening of the holster.
The other thing you can do if you sense a disturbance in the middle of the night and you do not have an accessory light on your home defense gun, is to walk down the hall and approach stealthily in total darkness. After all, it is your home. You should know your way around your own home and be able to walk around your home in total darkness and not stumble over furniture or fall down the stairs. (You may step barefooted on a piece of your kid’s Lego set, but that is a chance you will have to take.) Then as you approach the intruder in total darkness, flip on the switch to a house light and scare the shit out of him. Instead of hitting him with 500 lumens of light from your gun’s light, you hit him with light of a 60 watt light bulb from a table lamp or a ceiling fan.
Now, let’s look at this from the perspective of a concealed carry citizen. You have a light mounted on a your EDC, and found a holster that will accept your light. As you are out and about town, you go into a dark area, and a thug comes up to you and attacks you. At that moment in time your adrenaline begins to flow like water through a fire hose. You need to draw your weapon, make sure the light turns on, then aim at the thug. What if the light does not turn on automatically? What if the light needs to be turned on manually, and you forget to turn it on because of the adrenaline rush? Remember, most violent attacks happen in about 3 seconds. In Criminal Minds, the FBI can afford to have their lights turned on before they even enter the bad guy’s house, because they are on the offensive. You are not. You will not be turning on your light until and unless you are attacked. Why? Because if you go around your neighborhood at night with your gun light on, some nosy neighbor may call the police on you, identifying you as a burglar or worse. Walking to your car in a darkened parking lot while holding a flashlight is one thing. Walking to your car in a darkened parking lot with your gun drawn and your gun mounted light turned on is something entirely different. So the actual times and circumstances of using your gun light in a concealed carry situation is very limited.
So, a gun mounted light is great in certain circumstances, but not most. There are more reasons to not have a gun mounted light than there are reasons to have one.
The phrase “once bitten, twice shy” has to do with getting burned in the past and how one is now skittish about moving forward for fear of getting burned again for the same action. It has nothing to do with Great White’s 1989 cover of the 1975 hit from Ian Hunter. It’s about what happens when you don’t listen to your instructor’s directions about the proper gripping of your handgun.
This shooter is setting herself up for a painful experience at the range. The thumb of her left hand should be along the left side of the gun’s frame. Here it is in the perfect position so that when the slide flies backward, it will hit her left thumb.
In this case, the getting burned part is being “bitten” by your firearm in one of two ways: “slide bite” or “hammer bite”. These two bite sensations occur on pistols only. Revolver shooters will not experience either of these “bites”.
The gun’s beaver tail is not just a pretty curved feature of your firearm. It serves a very important safety purpose. The proper grip of the handgun is to have the webbing of the shooting hand wrapped tightly against the underside of the beaver tail, and none of the fingers or any other part of the hand above the beaver tail. Why? When the gun is fired and the slide moves backwards very quickly with the recoil, the purpose of the beaver tail is to allow the slide to move backwards unimpeded by keeping all parts of the hand out of the way of that recoiling slide.
Example of classic slide bite. In this photo, the shooter’s hand was above the beaver tail. When the slide kicked back, the two bottom rails of the slide were driven directly into the webbing of the shooter’s hand.
But when a shooter places a finger or webbing of their hand ABOVE the beaver tail, doing so does not allow the slide to recoil backwards unimpeded. This forces the slide to slam into that part of the hand above the beaver tail. And because of the gas pressure emitted when the round is fired, the slide always wins. Anything in the way of the slide moving backward will be moved out of the way or injured. This is a concept known as a “Slide Bite”. And it hurts like a mother!
“Hammer bite” is of a similar nature, but can only occur if the gun has an exposed hammer. As previously mentioned, when the gun fires, the slide recoils backwards very quickly. If the gun has an exposed hammer, it will push the hammer backwards very quickly as it re-cocks the hammer for the next shot.
Example of a classic hammer bite. The webbing of the shooter’s hand is above the beaver tail. In this photo, the hammer flew back and pinched the webbing between the hammer and the beaver tail.
If the shooter has any portion of their hand, usually the webbing of their shooting hand, ABOVE the beaver tail, when that hammer flies backwards, the hammer will pinch the webbing between it and the beaver tail. That pinching will also hurt like a mother!
Instructors can inform shooters about both slide bite and hammer bite until they’re blue in the face. The best teacher is experience. If the shooter gets bitten enough times, eventually the pain will correct this action. The only benefit the shooter has is a souvenir of their bite to take home to their spouse or partner. “Honey, guess what? I got bitten at the range today. Wanna see?”
When I take newbies to the range for their first ever live fire experience, they do not fear the bang. They do not fear the ejected hot shell casing going down their cleavage. They are not even afraid of a projectile rocketing out the muzzle of the gun at supersonic speeds. They fear the recoil! Many newbies are afraid they will be knocked back on their ass by recoil, or they will break a wrist by the recoil. That is simply not going to happen.
But what is recoil? Well, if you paid attention in high school physics class, you may have heard of Sir Isaac Newton’s “3rd Law of Motion” – for every action, there is an equal and opposite reaction. When a gun is fired, the bullet going out the muzzle is the forward action. Recoil is the backward reaction. And if you intend to enjoy the shooting sports, you have to manage it.
There are two kinds of recoil, “actual” and “felt”. Actual recoil is the scientific, or measurable, one. When a gun is fired, the gunpowder inside the cartridge explodes. The corresponding expanding gasses of this explosion creates the actual recoil. For a given gun and a given ammo cartridge, actual recoil will be the same for every shot. On semi-automatic pistols, it is this actual recoil which causes the slide to go backwards.
Felt recoil, on the other hand, is what the shooter feels. This is the recoil which makes newbies skittish. The “reaction” energy of the expanding gasses has to go somewhere. But where?
A .44 S&W Magnum (top) vs. a .22LR. Take a wild guess which one produces more recoil.
The answer is everywhere. Some of the energy is absorbed in the gun as seen when the gun’s slide moves backwards. Some of the energy is absorbed into the gun’s frame as seen when the gun’s muzzle rises. Some of the energy is absorbed by the shooter into the shooter’s wrist, arm and shoulder, potentially giving them that kicked-by-a-mule sensation.
Felt recoil can be managed and reduced, so these newbies are not so skittish. But before we address how to reduce felt recoil, we need to understand the components which make felt recoil more pronounced or less pronounced, or in other words, acceptable or unacceptable, to shooters. For all of these components, I will be referencing the use of a 9mm cartridge, since it is the most popular cartridge in the world.
Front of a .38 Special cartridge showing the “+P” stamp
Caliber Size– The larger the caliber, the more recoil. A .44 Magnum cartridge will have more recoil than a .22LR (Long Rifle) cartridge. That makes sense, since more energy is required to push a larger caliber bullet out the muzzle.
Bullet Size – Using the 9mm example, different size 9mm cartridges affect recoil differently. The projectile, or bullet, is available for the 9mm in multiple sizes. In this case, size is determined by weight of the bullet. The three most popular sizes of 9mm bullet are 115 grains, 124 grains and 147 grains. What is a grain? It is actually an apothecary unit of measure from the days when pharmacists measured powdered medicines by dumping the medicine on a scale and measured the dosage by counting specks or grains. For comparison, 7000 grains equals one pound. So, as you can figure out, each bullet weighs less than one ounce. But as it relates to recoil, the heavier the bullet, the more energy is needed to push that bullet out the muzzle. So in this case, the heavier the bullet, the more recoil is felt.
Hot Rounds – This does not mean the cartridge is hot to the touch. It means the cartridge is loaded with slightly more gunpowder from the factory. But putting more gunpowder in the same size cartridge means the gunpowder is getting compressed more. Think of putting 10 pounds of crap in a 5 pound bag. That additional compression is what is known as a “hot round”. The cartridges themselves are actually marked accordingly so the shooter knows they are shooting a hot round. The markings on the cartridge are usually “+P” or “+P+”, as an indication the rounds are loaded to higher pressures. The owner’s manual of each gun will indicate if a particular gun can shoot hot rounds safely. As it relates to recoil, hot rounds, with more gunpowder, will create a slightly bigger explosion than normal rounds. Thus, hot rounds will provide more felt recoil.
Examples of the mushrooming effect of Jacketed Hollow Points
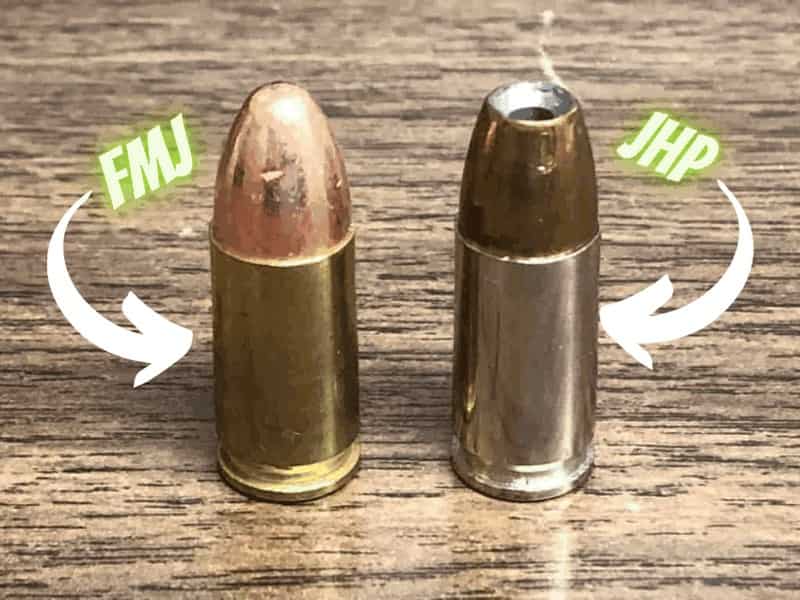
Bullet Style – Bullets come in two styles, Full Metal Jacket and Jacketed Hollow Point. Full Metal Jacket (or more commonly “FMJ”) rounds are made of copper or copper alloy and keep their shape when they hit the target. These are generally used for practice. Jacketed Hollow Point (or more commonly “JHP” or simply “HP”) rounds are made of different kinds of materials, and are designed to expand or “mushroom” when they hit the target. These are generally only used for self-defense. So when they hit a target, let’s assume a human torso, once inside the torso, they will expand. If you are in a life and death self-defense situation, you want the most stopping power available so the attacker stops attacking. As this relates to recoil, JHP rounds provide more recoil, because they generally are the 147 grain size. Again, in a life and death self-defense situation, you want as much stopping power as you can get. In this case, it will be the largest bullet size available. Another reason that FMJ rounds are usually not used for self-defense is because the bullet will often go through the attacker’s body. And one of the basic rules of safe gun handling is to know your target and what’s behind it. An innocent person could be standing behind the attacker, and using an FMJ round could put that innocent person in jeopardy.
The CZ-75 (left) is a polymer frame gun and the Glock-19 is an all metal frame gun.
Gun Material – As concealed carry grows in popularity, so does the need to offer lighter weight guns. To shave weight off a gun, manufactures are making their products with lightweight materials, such as plastics and polymers. But this is only in terms of the frame and components not directly involved with the cartridge explosion. The business end of the gun, where the explosion occurs, the gun’s barrel and breech, are still steel, but the frame may be made of polymers. As this relates to recoil, as mentioned earlier, some of the recoil energy is absorbed by the gun frame. The stronger the gun frame material, the better it can absorb the recoil. Metal frame guns can absorb more recoil than polymer frame guns.
Gun Size – Also, as another take away from the increasing popularity of concealed carry, is the need to offer smaller guns. Two very popular gun models for 9mm are the Glock 17 and the Glock 43. The “17” is a full frame gun and the “43” is a compact version. As this relates to recoil, larger guns have more material by which to absorb recoil than smaller guns. But does that mean you should avoid smaller guns? No. Smaller guns have their purpose, because they are more easy to conceal than large or full frame guns. And if your purpose of owning a gun is for concealed carry and ever have to draw that smaller concealed gun in a life or death situation to protect yourself or a loved one, no one will give a damn about any recoil, guaranteed!
Here are the relative sizes of the Glock 43 and Glock 17
Gun Style – Handguns come in two varieties, revolvers and semi-automatic pistols, or simply “pistols”. Revolvers have been the staple of handgun ownership ever since Samuel Colt invented the “Peacemaker”. But pistols have become far more popular. The primary reasons are the number of rounds a pistol can hold compared to a revolver, and the speed by which reloading can occur. As this relates to recoil, revolvers have more felt recoil. The reason is with pistols, recoil is absorbed by the slide spring. But with revolvers, there is no slide. The energy goes into the frame.
A high-speed camera image of a gun with a ported barrel being fired. The two ports on top reduce the amount of muzzle rise occurring because of recoil.
Barrel Style – Most pistol barrels are smooth from the breech right up to the muzzle. Some have tiny holes in them called “ports”. Just like a porthole on a ship is a hole cut into the hull, ports on a barrel are tiny holes drilled/cut into the sides or top of the barrel. Guns containing these holes are known as having “ported barrels”. These holes are designed to deflect or exhaust the hot gasses in an attempt to keep the barrel from rising after every shot. Ported barrels reduce recoil because some of the gasses are pushed backwards and the rest are pushed out these ports, rather than all of the gasses being pushed backwards.
Bore Axis – This is a fancy term for indicating the height of the barrel relative to the gun’s center of gravity. The higher the barrel is off the center of gravity, the more the gun will attempt to rotate around its center of gravity. When a gun is fired, the muzzle rises. This is due to the bore axis. The recoil wants to go straight back at the center of gravity, but because the barrel is not flush with, or the same height as, the center of gravity, but rather higher than the center of gravity, the gun rises. So let’s say you have a gun with a bore axis or height which is .5″ above the center of gravity, and another gun with a bore axis or height which is .75″ above the center of gravity. The gun with the higher bore axis will have more recoil. Just bear in mind if you go to a gun store and tell an inexperienced sales clerk you want a gun with a low bore axis, don’t be surprised if they give you that deer-in-headlights look, because most inexperienced gun sales clerks have no idea what bore axis means.
Example of bore axis analysis. The blue line is the center of gravity. The red lines are the bore axes. The gun on the right, with its higher bore axis, will have a higher muzzle rise than the gun on the left. The higher the red line relative to the blue line, the more recoil will be felt.
Hand Grip – This is the grip you provide on your gun. Grip the gun firmly, but not so firmly that you cut off your circulation to your shooting hand. This also means locking your wrist so the gun does not pivot around your wrist when fired, which is more predominant if you have a gun with a higher bore axis. You also don’t want to grip the gun loosely, either with your fingers or your wrist. This is the number one factor affecting felt recoil, and is completely within the shooter’s control for recoil reduction. This will allow the recoil energy to go into your arm, then be absorbed by your arm and body.
Arm Lock – This is having your arm completely straight out and locked at the elbow and wrist, whether you are shooting with both hands on the gun or only your shooting hand on the gun. This also will allow the recoil energy to go into your arm, then through your body.
Stance– This is being in the correct stance to help you balance yourself from the recoil. Your stance is the number two factor affecting felt recoil, and is also completely within the shooter’s control for recoil reduction. Using the normal isosceles stance we taught you in class, lean forward slightly at the waist. If necessary for balance, take your foot opposite your shooting hand and move it forward slightly. So if you are a right-handed shooter, move your left foot forward slightly once you are in your stance.
Okay, now that you have an understanding of the causes of greater or lesser felt recoil, are there actions you can take to minimize felt recoil? Yes, here they are:
First, determine the purpose of your first gun. This decision is by far, the biggest determinant of your anticipated recoil. Will your first gun be used for concealed carry? Will it be for home self-defense? Will it be for target shooting? If you want a self-defense gun, do not get one chambered in .22LR in an attempt to reduce felt recoil. While .22 cartridges are lethal, they are generally not used for self-defense because the rounds fired from a .22 have to hit the bad guy in the correct spot on his body to stop an attack. Shooting him in the leg will piss him off, but probably will not disable him to the point the attack stops. However, double-tapping him in the head with your .22 will stop the attack. The rule of thumb for self-defense is to look at what law enforcement uses. They never use a .22.
If you want one for concealed carry, do not select a model the size of a Howitzer. Select one, based on size and weight, that will be acceptable for you to carry all day. If your purpose is only for home defense, then you can go with a full frame gun, because that gun will be sitting in a safe or a nightstand until you need it to put down an armed intruder.
Second, pick the correct bullet size for your caliber. For 9mm, generally, 115 FMJs are perfect for the range, and 147 JHPs are perfect for self-defense. If you are going to shoot more than one magazine’s worth of rounds at the range during your visit, then select the smallest bullet you can to reduce the per round recoil as much as possible. Your goal at the range it to improve skills while having fun. Improving skills but hating the recoil of each round will make for a lousy time at the range.
Third, ignore hot rounds. The purpose of a hot round is to over penetrate the bad guy. If you are in Miami, everyone wears thinner clothes, so a hot round is not necessary. However, if you are in Fairbanks Alaska, where everyone wears a winter parka, hot rounds make sense, so the round travels through the heavy winter clothing easier.
Fourth, pick up a lot of FMJ rounds, as these are your standard practice rounds. At some point, however, you will need to practice using JHPs, so God forbid, if that self-defense need ever arises, you will have practiced with them.
Fifth, select a gun style of your choice. Some shooters love revolvers, most don’t. So if you want to reduce recoil, get a pistol, not a revolver.
Sixth, select a gun whose material and size you can live with, based on your purpose above. If you are going to conceal carry, do not get a full frame metal gun. There is nothing wrong with doing so. It will just be a heavy gun not easily concealed. But recoil will definitely be reduced. So gun size and material are compromises. Pick the best comprise for you. I own a Sig Sauer P226 MX-25 edition. Great gun. Accurate gun. Love shooting that gun. Hate carrying that gun, because this model is the identical model issued to the Navy SEALS, who do not need to conceal a thing.
Seventh, if the gun you are interested in is offered in both ported and non-ported barrels and you want to reduce recoil, go with the ported model. It will be more expensive than its plain-Jane counterpart, but there will be a reduction in recoil. A qualified gunsmith can also help you port your gun’s barrels.
Eighth, practice shooting with your grip firmly around the gun, your arms locked at the elbows, and having a correct stance. Then practice shooting with your hand grip looser, elbows unlocked and bent slightly, and no lean in the waist. Compare the felt recoil.
Ninth, practice, practice, practice. Of course dealing with recoil can be tricky if you are just starting out. But over time, you will learn how to adjust what you need to in order to minimize recoil as much as possible. Did I mention practice?
Should you carry concealed with a round in the chamber or not? There are hundreds of web sites and YouTube videos of the pros and cons of carrying with an empty chamber or a round in the chamber. So, let’s answer this with another analogy. Do you leave your seatbelt unbuckled and only buckle it right before the accident?
If you carry concealed with an empty chamber and have to draw your gun in self-defense, you must go through the following actions. You must:
Lift up your cover garment: jacket, shirt, sweatshirt, etc., to expose your concealed gun.
Draw your gun.
Put the thumb safety into “fire” mode.
Rack your gun to chamber a round.
Get your gun on target.
Line up the sights and squeeze the trigger at the bad guy.
This is a lot of activity which must occur within split seconds…a lot to think of during the stress of a self-defense situation. What if something goes wrong? What if the round does not chamber quickly, say because of a marred feed ramp? What if you aim your gun at the bad guy, only then realizing you forgot to rack a round? Can you remember to do all these activities in this order and still protect yourself or your loved ones?
If you carry concealed with a round in the chamber and have to draw your gun in self-defense, you must go through the following same actions, except one. You must:
Lift up your cover garment: jacket, shirt, sweatshirt, etc., to expose your concealed gun.
Draw your gun.
Put the thumb safety into “fire” mode.
Get your gun on target.
Line up the sights and squeeze the trigger at the bad guy.
So in this scenario, there is still a lot of activity which must occur in this order within split seconds, but there is one less activity…that of chambering a round. You no longer have the worry about whether that first round will feed correctly.
So why do concealed carry gun owners carry with an empty chamber? The real answer is: Because they have a fear of a negligent discharge. Remember, there is no “accidental discharge”. So, any unintended discharge is a negligent discharge. Simply put, they failed to do all things correctly and a breakdown occurred, resulting in a negligent discharge.
But what causes this fear? It is the lack of experience and training. Plain and simple. Gun owners with this fear simply have not trained enough to be comfortable carrying with a round in the chamber. Maybe they never got trained. Maybe they never got trained properly and completely. Maybe they had a bad experience, such as their cover garment getting stuck somehow. Maybe their gun somehow got stuck in the holster. Maybe the shooter feels they cannot draw quickly enough, or maybe upon drawing their gun, their holster came with it. An executive vice president at Sig Sauer was recently interviewed and told the interviewer that more than 50% of the gun owners never shoot their guns.
Whatever the excuse…er…reason, the simple fact is the shooter does not yet have enough experience to overcome that fear. They have not tried to remedy any and all of the possibilities to eliminate that fear. The elimination of a negligent discharge or the fear of one is the most easily fixed situations within the gun owning world. Let’s look at all the other things people do in their everyday lives which eliminate fears of injury or death in their lives. People don’t get driver’s licenses until adequately trained and tested to drive a car. Construction workers don’t operate heavy machinery until adequately trained to do so. Airline pilots don’t fly planes until adequately trained and checked out to fly a specific model of plane. Lawyers don’t practice law until adequately trained and passed the bar exam. So why is it that gun owners do not undertake the necessary training needed to eliminate fears of injury or death?
So let’s assume this is you. So how do you eliminate this fear? Two simple answers: the right gear and the right training.
First, make a carry decision? Decide how you want to carry your EDC and stick with that decision. Now, this will require lots of practice using different carry positions. If you like the strong side hip, then stick with and practice carrying on the strong side hip. If you like to appendix carry, then stick with and practice appendix carry.
Second, choose and settle on the right holster and gun belt for that anticipated carry position. Get a holster designed for appendix carry if you decide that is your preferred carry position. Get a holster which stays put, and does not loosen from its mounting position as you draw your firearm. As a sidebar to this, if you decide to carry anywhere around your waist, make sure you get a good gun belt…a belt thick enough and strong enough, usually leather, to hold the weight of your gun. Another reason newbies have a fear of a negligent discharge is because they have their holster mounted on a thin fashion belt. The fear comes from the looseness of the holster’s belt clips and the belt itself. These clips are often 1.5″ to 1.75″ wide and the fashion belt may be .75″ to 1″ wide. That differential in widths is enough to allow the holster to move up when the gun is drawn from it, providing a fear that the entire holster will rise up when the gun is drawn. So get a holster which stays put. I recently purchased a new OWB holster to carry my EDC in the 4:00 position. I holstered my gun. When I went to practice drawing the gun from the holster, the holster came right off my belt.
Third, get a holster which completely covers the trigger of your EDC. If the holster does not completely cover the trigger, trash it! Only consider holsters which completely cover the trigger. This should be the biggest fix to overcoming the fear of a negligent discharge. If nothing can get between the trigger and the trigger guard, the gun cannot fire.
Fourth, choose a holster which securely holds the gun made for your gun model. Do not get one of those holsters which will hold multiple makes/models and whose description reads “all subcompacts” and the like. In order for those kinds of holsters to work with multiple gun makes/models, compromises have to be made on the holster’s design. What you want to avoid is the possibility of the gun moving within the holster or falling out of the holster based on your body’s movements. If you need to bend down to tie your shoe, the gun should not be slipping out of the holster.
Fifth, avoid Nylon holsters, because Nylon is not rigid enough. This also goes for the accompanying nylon strap which covers the back of the gun securely in the holster. These straps are often referred to as “thumb straps” because you use the thumb of your shooting hand to unsnap them.
Sixth, stay away from any holster which has to be “broken in” such as those made of leather. Leather holsters look really great if you dress up for a night on the town in Wyoming, but leave a lot to be desired with retaining your EDC. Why? Holsters which have to be broken in will require you to work the leather to soften it by holstering and drawing your gun enough times as necessary so the leather gets soft and pliable, and begins to form to the contour of your gun. This repetition may be a couple of hundred times. And then when that is done, you will still never get a perfect fit. Rather, what you will get is a fit on what I call “touch points”, points where the leather actually touches the metal of your gun. And in the process of working the leather, as you move your gun in and out of the leather, when the leather makes contact with the gun’s touch points, this process begins to wear off the finish of your gun at those touch points. The fix for this wearing is to stick your EDC in a Zip-Loc bag first, then move the gun and the bag in and out of the gun. I have a leather holster for my Sig P226 and it is very difficult to work with. The actual holster part is about .25″ of leather, which for a holster, is very thick, and at that thickness, not very pliable. And as soon as I noticed “wear” marks in the (touch points) slide of the gun, I stopped using this holster.
Seventh, choose a holster with good retention, such as those with audible “clicks” when the gun is holstered. Usually, these types of holsters are made of Kydex. Kydex is a polymer plastic which becomes malleable when heated. Click here if you want to read more about Kydex. The great part of Kydex holster is that models are designed for your specific gun. There are no “touch points” as the entire holster is custom molded for your particular make/model.
Eighth, stay away from those holsters which have a button on the side which needs to be pressed in order to release the gun from the holster. In the heat of a self-defense situation, pressing a release button just adds one more activity you need to think about doing and wastes more critical time on you drawing your gun.
Ninth, okay, now that we have beaten holsters to death, the next fix for fear of a negligent discharge is to practice drawing. Using your desired holster and located in your desired carry position, slowly practice drawing. Use a large mirror if you have to. Whatever it takes for you to learn until you have drawing down cold. For the sake of argument, let’s say you are right handed and your desired carry position will be your strong side hip. That means the holster will be located on your right hip.
Tenth, now regardless of whether you chose an Inside the Waistband (IWB) or Outside the Waistband (OWB) holster, you need to practice the actions identified in the beginning of this post. Start by making sure your gun is completely empty. Pull out the magazine and rack the slide, physically looking into the chamber to be certain there is no round in the chamber. Put the safety into the “on” position. Then practice lifting your cover garment. This will require you to use your non-shooting (left) hand to lift up your cover garment by crossing over your belly. Lift up the garment just enough to expose your gun. You don’t need to lift up the garment so high as to expose your six-pack abs or your 38DD boobs. Just enough to access your gun unimpeded by clothing.
Eleventh, begin drawing your gun from its holster. What should be happening is that three fingers of your shooting hand should instinctively begin wrapping around the gun’s grip. This will be your middle, ring and pinky fingers of your shooting hand. As the trigger guard clears the holster, your index or trigger finger should be fully extended and immediately be lining up on the right side of your gun’s frame, in what we call the “proper trigger discipline procedure”. NEVER, repeat, NEVER put your trigger finger inside the trigger guard until you are ready to pull the trigger. This lack of trigger discipline is a primary cause of negligent discharges. While you are drawing your gun from its holster, your right thumb should begin pushing the thumb safety into the “fire” position.
Twelfth, as the gun completely clears the holster, and the thumb safety is “off”, begin aiming your gun (in what is called “sweeping”) in the direction of the bad guy. If you are following proper gun handling procedures and discipline, your trigger finger should still be alongside the frame. Here is where many newbie gun owners get skittish. While aiming, they are afraid the gun’s muzzle will sweep over or in front of innocent bystanders, thus another area of fear. The fix here is called situational awareness. Within micro-seconds, you need to know where the bad guy is and where innocent people are so that you begin your sweep without pointing your gun at those people.
Thirteenth, begin aiming the gun at the bad guy, using the proper sight alignment and sight picture you learned in our training class. Only NOW can you move your trigger finger inside the trigger guard.
Fourteenth, re-holster your gun, but NEVER speed-holster your gun. This is the practice of seeing how quickly you can get your gun re-holstered. This is a stupid move, if you do this. Why? If you have to draw your gun in a defensive situation, why in the world would you want to re-holster it? What if your attacker has a partner who is late to the scene? So, keep your gun drawn until the police arrive. If this ever happens to me, I am drawing my gun and leaving it drawn until the police show up, at which point I’m throwing it on the ground and not re-holstering it. So there is absolutely no reason in the world to speed holster your gun. So re-holster your gun, taking your time.
Fifteenth, now repeat these steps with a snap cap in the chamber. You need to get comfortable with a round in the chamber.
Sixteenth, practice these steps repeatedly until you are very comfortable drawing your gun. These actions need to turn into muscle memory. Most defensive situations last only 3 seconds. If you don’t commit these drawing actions to memory, the situation may be over before you begin. So, after you get comfortable with drawing, then practice drawing quicker and quicker.
Now, let’s try a variation of these steps. Train on step 10 through 16 again, but this time force the gun to attempt shoot. So, in step 10, as you are drawing the gun from your holster, deliberately break the trigger discipline rule and put your finger in the trigger guard. As you draw, squeeze the trigger. If the gun fires, you are negligent. But don’t get pissed off. Learn from this “if I have my finger in the trigger guard as I am drawing, the gun can fire.” Learn through this and other negative experiences what not to do. This is just like sticking your finger in a wall socket. At some point, the electrical shock will teach you to not put your finger in a socket anymore. But practice breaking these safety rules with snap caps instead of live ammo.
After your gun has been drawn, begin pointing your gun at the bad guy, while at the same time, squeeze the trigger. If the gun fires prior to you aiming at the bad guy, you have a negligent discharge. Learn from that. At some point, you will have the wall socket response and soon you will not be sticking your finger inside the trigger guard until you are ready to shoot.
There is one more action which should be listed in the steps above, but isn’t. STOP watching those bullshit action movies and TV shows! Hollywood is the main culprit leading to these fears, leading you to believe that dropping a handgun on the ground causes it to fire. To understand more about this topic, read my blog post on this subject here.
So as we conclude, remember this phrase. “Amateurs practice until they get it right. Professionals practice until they can’t get it wrong.” Be that professional. Practice until you cannot have a negligent discharge through normal, safe operation. Then you’ll start carrying confidently with a round in the chamber.
Excerpted from Massad Ayoob’s book, “Straight Talk On Armed Defense”
Commandment I: If You Choose To Carry, Always Carry As Much As Possible. Hollywood actors get to see the script beforehand, and nothing is fired at them except blanks, right Alec Baldwin? You don’t have either luxury. Criminals are opportunists and will attack people in times and places where they think the victims will not be prepared for them. The only way to be prepared to ward off such predators is to always be prepared by being routinely armed and constantly ready to respond to deadly threats against you and those who count on you for protection. It’s not about convenience. It’s about life and death.
Disclaimer. Dakota Firearms has the utmost support and respect for our phenomenal military and law enforcement, and this article is in no way a slight on what they do for our protections.
The majority of gun trainers come from one of four backgrounds: military service, law enforcement, competitive shooting, and everyday Joe. Three out of the four backgrounds generally do NOT make good gun trainers, with explanations to follow as to why not.
There are as many paper target types as the day is long. There are the standard round bullseye targets, animal silhouette targets for hunting….turkeys, deer, etc. And there are targets in the shape of a human torso. And to extend the human torso types even further, there are photographic targets of actual bad guys…those in which the bad guy is pointing a gun at the shooter.
When selecting which targets you want to use, consider what your practice purpose is. Are you honing your skills for hunting? For competition shooting? For new gun familiarity? For self-defense? For fun? Since most of what Dakota Firearms is all about, concentration will be for familiarizing yourself with a new gun and for self-defense.
This is an NRA target, a typical example of the standard bullseye target with concentric circles.
After you purchase a new gun, your goal is to gain mastery of it. To that end, your best target choice is the traditional round bullseye target. Why? Most of these targets contain either a series of concentric circle lines culminating in the center bullseye or they have a grid pattern of horizontal and vertical lines, or a combination of concentric circles and a grid. The last type is the best out of all the bullseye targets because you want to use these lines to judge how well or how poorly you are shooting.
Within this group of bullseye targets, there are two basic styles, “reactive” and “non-reactive”. The “non-reactive” targets are the traditional black and white targets with the bullseye area in black. Depending on your distance to the target and the lighting conditions at the range, any holes put into the black area of the target may be difficult to see. The only way to see how well you just shot is to get up close to the target. The other type is a “reactive” target. These targets have two distinct colors, one bright and one dark, with the dark area usually making up the bullseye. When you shoot at these targets, a bit of the light color seeps through and surrounds the hole you just made. So, if you have a yellow and black reactive target, if you shoot the black bullseye, the hole created by your bullet will have a small bead of yellow seeping through and surrounding the hole. This yellow bead showing up as the circumference around the hole makes the hole far easier to see at farther distances and poor lighting conditions. Based on just this eye relief alone, reactive targets are preferred over non-reactive targets.
This is a reactive target. Notice how the shot holes have a yellow circumference around the hole…way easier on the eyes.
Since you are not practicing for competition shooting, you will not practicing how close you get to the absolute dead center of the bullseye. Rather, you will be practicing to place your rounds into groups. If you are a new gun owner, your shot placement on the target will probably be all over the place. AND THAT IS OK! If you hit the target, you achieved your first victory. As you continue practicing, getting more comfortable with your new gun, and gaining mastery over it, by using the “Shooting Fundamentals” taught in our training classes, your shot placement will get better. The holes in the paper will begin to get closer together…into tighter groups. You may start off with a group the size of a dinner plate, but over time the size of the group will be that of a coffee mug. So, what if the group is to the left and outside of the bullseye? Nothing to worry about. That can be corrected if you are shooting in the same general area with regularity. New shooters attempt to get every shot into the bullseye, and get disappointed when they don’t. But if you are regularly shooting tight groups with bullseye type targets, now you are ready to move on to self-defense practicing.
Realistic photograph of bad guy with hostage target. This makes for interesting training as you attempt to take him out without injuring the hostage.
Self-defense practice is more concentrated shot placement than gun familiarity training. Why? Because the purpose of self-defense training is to place shots to neutralize a violent attack. That means on an attacker, the best shot placement is “center mass”, better known as the chest. First, it is the largest area on humans, and therefore the easiest to hit after the adrenaline has kicked in because you are threatened by a violent attacker. Second, it contains the most vital of organs, the heart. The second best shot placement is the head, because it too, is vital, but smaller than center mass, and a little harder to master. Therefore, the better targets for self-defense are those which are silhouettes of the human torso. These generally have concentric circles around the chest and the head.
There are other subjects for targets, if you want to shoot just for fun. Some of these are of Osama Bin Laden, Dr. Fauci, snakes, zombies, etc. The download section of this web site has a few you can download for free for fun.
The other component of self-defense training is psychological. It is in our DNA to not take a life. But some day, you might need to do just that, because it may be either your life of the life of the attacker. So, to begin to condition your sub-conscious mind to shoot at another person, the absolute best targets for that psychological conditioning are the ones which are actual photographs of bad guys pointing one or more guns at you. Practicing with these types of targets, can, over time, subconsciously train your mind to permit you to shoot someone.
The other type of target is everything but paper. This includes steel, aluminum, and hard rubber targets. Some are the shape of dinner plates. Others are novelty targets such as silhouettes of squirrels, rabbits and crows. Some are in the shape of a torso.
This is a set of 5 steel dinner plate targets. In this photo, the shooter will be off to the right. As each plate is hit it falls backwards. After all five have fallen, from the shooter’s table, the shooter pulls a cord, and these targets reset, again sitting upright for the next round of fun.
I arrived at my outdoor range one day and noticed a man teaching his wife to shoot. She was shooting his .38 snubnose at a close up paper target, and as I stood behind them and watched, I could tell with the expression on her face, she was having difficulty hitting the paper target let alone scoring bullseyes. A .38 snubnose is a great little handgun, but not my first choice for a new shooter who has never held a gun, let alone fired one.
The range we were at consisted of paper targets on the left side and steel targets on the right side. The best way to teach new shooters is not to have them shoot for bullseyes. Remember, as they are new, they will be shooting all over the place, assuming they hit the paper at all. So, rather than having new shooters attempt to hit the bullseye, the best approach for live fire training is to have them shoot at a target which will instantly let them know they hit it.
This is a self-healing hard rubber target, designed specifically for .22s. As you can see, the target can hang from chains attached to the two holes on top.
To that end, I suggested this couple move to their right and shoot at the steel targets. If the target is hit, the shooter will hear a distinctive metallic “plink” sound. In addition, these targets are hanging from chains or on pivots, so they will move when hit, a visual cue you hit something.
The point here is that first time shooters simply need to see success right away. They don’t want to or cannot afford to go through half a box of expensive ammo just to “get inside the black”, and that is where these other types come into play. Those dinner plates the wife was hitting were 6” in diameter. Small by steel target standards but large when compared to paper “bullseye” standards.
The couple took my advice, moved to the right and the wife began shooting at steel 6” dinner plates, squirrels and rabbits. After one or two missed initial shots she began hitting the targets. The targets began gently swaying back and forth like a clock pendulum and the distinctive plinking sound was heard. The wife turned around and gave me the biggest ear-to-ear grin, realizing she was finally hitting something. So, a frustrating time at the range turned into a fun time at the range.
This type of novelty target is a 1/2″ thick steel gopher. It sits on the ground and when hit, say the head, it drops backwards. The base has a counterweight to automatically bring the target upright again.
The nice thing about these steel targets is that they are very thick pieces of steel, some up to ½” thick. I say this because aluminum coffee cans can offer just as much fun, but one has to be careful. The difference is that they are extremely thin compared to steel. When I first began shooting when I was about 9 years old or so, my father took me to an empty corn field. He took an empty coffee can, inverted it and stuck it on top of an old corn stalk in the middle of this empty field. The stalk was high enough and flimsy enough so that even the slightest breeze would wave it. I shot my father’s .22 rifle at this inverted can and it moved, albeit slightly, but it moved. That means I hit it. So, aluminum targets can bring much enjoyment.
Another type of non-paper target is the novelty rubber ones. These are made out material similar to self-sealing fuel tanks in airplanes. They are designed only for .22s. Using any larger caliber would obliterate the target. They are designed in unusual shapes and offer up some kind of movement when hit. They spin around like an Olympic gymnast on the high bar, wave back and forth like a clock pendulum, or twirl around like a dreidel.
This type of novelty target, when hit, will spin around the axis, similar to an Olympic gymnast on the high bar. This is designed for .22s.
If you are shooting at a public range or a range of a gun club, check with the club on the kinds of targets you can or cannot use. One such target material that is strictly verboten is glass. Never, ever shoot at glass targets, like empty pickle jars. Hitting it creates glass shards which must be cleaned up. Shooting at glass targets is the fastest way to get you kicked off the range.
We hear this phrase regularly. But what is muscle memory? Muscle memory is the act of committing a specific motor task into memory through repetition.
We all do it. When Tiger Woods was in his prime, and did not have a match, he would practice hitting thousands of golf balls a day, allowing him to be the best golfer in the world. He committed the motor task of his golf swing to memory. And everyday people commit everyday motor tasks to memory too. Every time we want to start our car engines, we instinctively put our foot on the brake pedal before pressing the “start” button or turning the ignition. We have committed the task of stepping on the brake pedal to memory BEFORE we attempt to start the car.
In the gun world, muscle memory is THE most important thing a gun owner can learn and use, both on a physical level and on a mental level. More important than aiming. More important than breathing, or trigger pull. This is what’s known as a “conditioned response”. Remember this phrase: “Amateurs practice until they get it right. Professionals practice until they can’t get it wrong“.
Let’s start with the physical level. Before we even consider shooting rounds downrange, gun owners need to know and be able to operate every control on their gun(s)…racking the slide, releasing the slide lock, dropping the magazine, opening the cylinder, inspecting an empty chamber, etc. All these actions must be committed to memory under a variety of circumstances. One circumstance is pitch darkness. If your gun is for home defense and stored in a nightstand, and a home invasion occurs at 3:00 am, as you reach for your gun out of your nightstand, you need to know if a round is chambered, if the magazine is inserted and if the safety is on or off before engaging the threat. You cannot ask the intruder “hold on, I need to load my gun”. Another circumstance is being able to quickly draw your gun from your holster in an attempt to stop a violent attack. You cannot ask the assailant “hold on, I can’t get my gun out of its holster”. A third circumstance is weather. If you need to draw your gun for self defense outside when the temperature is below freezing, you may have gloves on during the draw. You should practice drawing with gloves on. You cannot ask the attacker “hold on, I need to remove my gloves.” Conversely, if the temperature is 94 degrees and the humidity is 90%, drawing with sweaty hands could be a problem. Therefore, you need to practice that extreme as well. Again, you cannot say “hold on, I need to dry my hands.”
And practice you must. There are law enforcement agencies out there, some even at the federal level, which do not budget dollars or time for their officers / agents to practice at the range. And it shows! There are measurable statistics available which demonstrate that the hit rate (the percentage of the number of shots fired vs the number of shots hitting their target), in this case the bad guy hit rate of officer-involved shootings is only about 14%. That means that only 14% of the time did the officers hit the bad guys. That is embarrassing, simply because these officers don’t practice enough for their highly stressful jobs.
I teach these muscle memory actions in my class, but the classroom hands-on practicing only goes so far. With everything I cover in class, there is simply not enough time in a class to teach you and work with you to draw your gun from its holster as many times as it takes for you to feel comfortable and commit the motor task to memory. You have to take what is taught in my class and practice it at home, repeatedly until you can perform the motor task instinctively. Practice racking the slide 100 times, 200 times, however many times it takes.
Now, let’s move on to the mental level. After the class introductions, the first thing I teach in my classes are the Rules of Safe Gun Handling. Since I am NRA certified, I use the NRA rules, three of them. In my class, the three rules are read aloud in unison by all attendees. Then, at various points throughout the class, the rules are repeated…and repeated. But again, but with the volume of topics I cover, there is not enough time to repeat those three rules as often as necessary for students to commit them to memory while in class. They need to do that at home, by repeating those three rules in their home. So, to that end, I provide NRA postcards for students to take with them, so they can stick the postcard on the refrigerator door, bathroom mirror, or anywhere desired in order to learn the rules and commit them to memory. If, in the future, if I meet a student on the street, they should be able to recite the three rules to me instinctively.
Now, there is another mental level concept that requires muscle memory…your state’s gun laws. But the topic is so vast, it is the subject of another post.
When it comes to practicing and honing your firearm skills, nothing beats live fire training at the range. But what if you can’t get to the range? Do you give up on practicing? Now, you don’t have to! There are products on the market which will allow you to continue practicing in the comfort of your home. Yes, you read that right. Practice in the comfort of your home. But not with live ammo. With lasers!
There are products on the market which allow you to set up a paper/cardboard target somewhere in your home, and shoot a laser beam at that target using your own gun. You simply insert a laser cartridge of your gun’s caliber into your gun’s chamber, and rack the slide. When you squeeze the trigger, it fires a momentary laser beam at your target. Completely safe. But there are just a few hitches.
Typical 9mm laser cartridge
First, the projected laser beam is momentary. Your eye and brain will probably not register where the laser hit on the target. Your brain may register one round, but not remember enough of them to determine how your shots are grouping. To compensate for that, there are products on the market which allow you to download and install an app for your smartphone. You launch the app, point the phone’s rear camera at your target so the target completely fills the phone’s screen. When you squeeze the trigger and the laser beam fires at the target, the phone’s camera records the laser beam’s shot placement. As long as the app is running, you now have a record of all your laser beam shots. By looking at your phone’s screen, you can see how your shots are hitting on the target. Are you shooting left? Do you have a tight group?
Second, since the laser cartridge simulates an actual cartridge, after every shot your gun’s firing pin needs to be reset, so the next time you squeeze the trigger, the firing pin can strike the laser’s primer during the next shot. This means that if you are shooting a semi-automatic pistol, you have to manually rack the slide after each shot, because there is no recoil from expanding gunpowder gasses to do that for you. The whole purpose of owing a semi-automatic pistol is so the racking and reloading is…well…automatic. Manually racking the slide blows away any follow through you may have been working towards perfecting. To compensate for this second hitch, assuming you like using systems like this, you have no choice but to invest in a revolver. Let’s say you purchase a six-round .38 special. You then need to invest in six (6) identical .38 special laser cartridges, one for each round in the cylinder. Then you can shoot all day, as there is no racking. Simply keep squeezing the trigger. The cylinder will just keep spinning, shooting off laser round after laser round, all the while your smartphone app keeps recording your shot placement.
Blowback laser trainer
But what if you don’t want to invest in a revolver for indoor laser training? Is there a way one of these laser trainers can allow you to shoot shot-after-shot without the need to rack the slide after each round? The answer is “yes”. There is a system out there called the “Blowback Laser Training” system. This is the most realistic laser training system I have ever seen. It is a real-looking full-frame semi-automatic pistol which shoots a laser beam using compressed air (CO2). The compressed air, identical to the CO2 cartridge used in Daisy BB guns, recoils and racks the slide, simulating live fire training, but 100% safe. It allows you to practice all the follow through techniques you were working so hard to attain. When the gun is fired, the compressed air from the CO2 cartridge is released and “recoils” the slide, similar to a normal gun. The barrel even jumps up slightly. But when the slide closes, and if you are using the correct follow through, the barrel comes back down…right on target.
The Blowback system kit comes with the following:
Training gun
Battery pack (housed in the gun’s grip)
Battery charger
I use one of these Blowback guns in my training classes, and it is a phenomenal training tool! Keep in mind, many of my students have never held, let alone fired, a handgun. This training gun is absolutely perfect for them to use, to see if gun ownership is for them. Firing the Blowback gun 1) recoils, 2) racks the slide, and 3) goes “bang”. Yes, there is an audible “bang” sound, just as through a real gun was being used. But instead of a live projectile exiting the muzzle, a laser beam exits the muzzle.
Black Kydex Holster
Battery and CO2 magazine
Now, why should you, as a gun owner or potential gun owner, consider investing in the Blowback system? Here’s why:
No investment in ammo. Every time a liberal politician fires off rhetoric about more gun control, the cost of ammo rises. If you decide to shoot 200 rounds of “real” ammo during your range training visit, at $.55 per round (9mm) that’s a cost of $110, for an afternoon of fun at the range. If you do that once a month for a year, that’s over $1000 in ammo.
No investment in fuel. With gas prices approaching the highest on record, depending on how far you you live from the range, that could be a nice chunk of change.
No range fees. If you shoot at a range, you either have to invest in a membership or pay per use fees every time you go.
No permits or registration required. This means you don’t need to go through background checks and any other registration your state requires. It also means you can begin teaching young children the concepts of safe gun handling, so that when they reach the responsible age when you can take them to the range for live fire training, they will already be experts in safe gun handling.
100% safe, shooting lasers instead of bullets. The battery pack for the laser will fire 2000+ laser shots before it needs recharging.
Simulates the weight of a real full-frame handgun, not the weight of some plastic toy gun.
Realistic recoil and slide racking when fired. Yes, there will be an audible bang, the same as you would hear with a real handgun. But the bang is not so loud as to damage your hearing.
Purchase CO2 cartridges anywhere…Walmart, Amazon, Cabela’s, etc. The CO2 cartridge is the only consumable item in this system. And they are cheap, with many deals going for $1.00 per cartridge. Each cartridge is good for about 50 shots. That’s 2 cents per round!
Practice speed drawing. Use the optional holster to improve your reaction time for that ever-so-critical time between when a violent attack begins to occur and your reaction to that attack. The BLT kit comes with a target which contains a countdown timer, so you can practice your speed drawing.
Perfect for new gun owners. The number one fear of new shooters is recoil or the anticipation of recoil. With the Blowback system, you get that fear out of the way without the additional fear of danger.
So, if you have an interest in looking into the Blowback Laser Training system further, visit the company’s website. Simply click on the Blowback Laser Trainer gun image above to be taken to the company’s web site for more information or to purchase. You can purchase it from there, or if you prefer, you can purchase it through Amazon.